
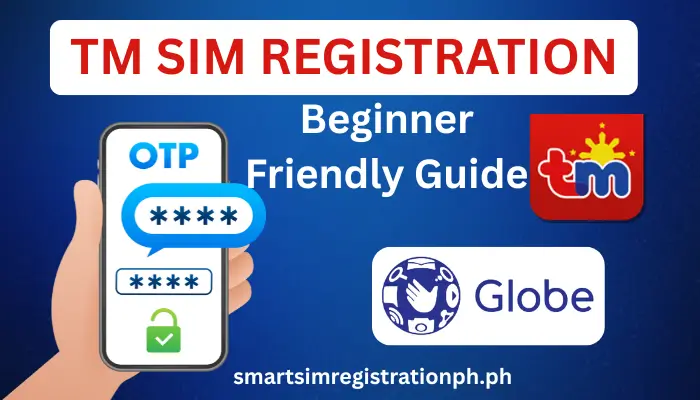
TM Sim Registration
Staying connected starts with a registered SIM. If you’re using a TM SIM in the Philippines, registration is not optional—it’s the law. This process keeps your number active, secures your account, and helps prevent scams. The good news? Registering your TM SIM is simple, and you can do it online, through the GlobeOne app, or in person.
In this guide, you’ll learn every method to register your TM SIM, how to check your registration status, and what to do if you face errors along the way.
Why Register Your TM SIM?
You need to register your TM SIM to keep it active. The Philippine SIM Registration Act requires all SIM cards to be registered. If you don’t register, your SIM will be deactivated.
Registration also protects you from scams and fraud because your SIM will be linked to your verified identity. This makes it harder for criminals to use unregistered numbers for illegal activities.
After completing registration, you can continue using TM services and enjoy rewards like free data, text, and call promos.
Why Choose TM Tambayan SIM?
TM is one of the most affordable mobile networks in the Philippines. It offers low-cost call, text, and data packages, making it ideal for budget-conscious users.
You also get wide coverage, so you can stay connected in most areas across the country. TM rewards its users with regular promos and freebies, including extra data and discounts for registered SIMs.
Important Notes Before Registration
Before you start the registration process, make sure you follow these steps:
What are the Requirements of TM SIM Registration
To complete your TM SIM registration, you need specific documents and details depending on your category. Below are the requirements:
Valid ID List
Document Requirements
Document Requirements for Special Cases
Some users may need additional or specific documents depending on their situation:
For Tourists and Foreign Nationals |
For Minors |
|---|---|
|
Valid passport |
SIM must be registered under a parent or legal guardian |
|
Visa or entry permit |
Valid ID of the parent or guardian |
|
Alien Certificate of Registration (ACR I-Card) |
Child’s birth certificate may be asked in some cases |
|
Proof of address (hotel booking, rental contract, or local contact) |
The adult assumes legal responsibility for the SIM usage |
|
School enrollment proof (for foreign students) |
|
|
Work permit or employment contract (for foreign workers) |
How to Register TM SIM CARD
TM offers several ways to register your SIM, so you can choose the one that’s most convenient for you. Below are the available methods:
1. Register via Online Portal
The easiest way to register your TM SIM is through the official portal. Here’s how:
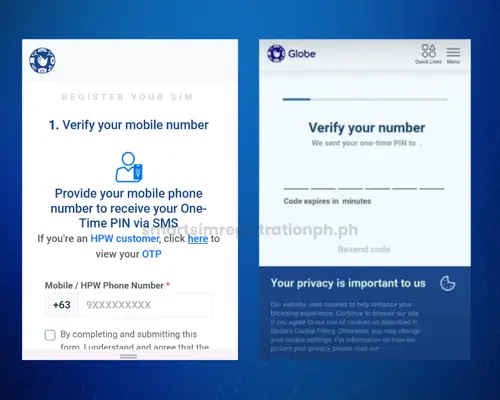
Step 01: Open https://new.globe.com.ph/simreg on your phone or computer. The process is same as globe sim registration.
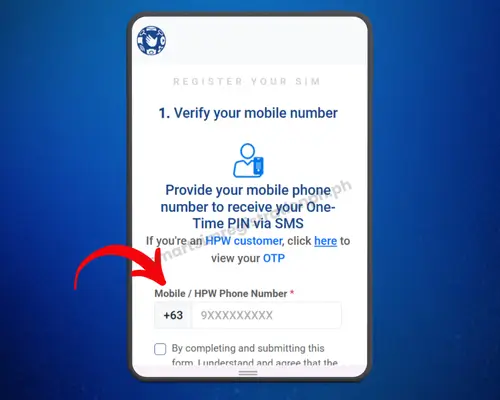
Step 02: Type your TM number and click “Register”. You’ll receive a One-Time PIN (OTP).
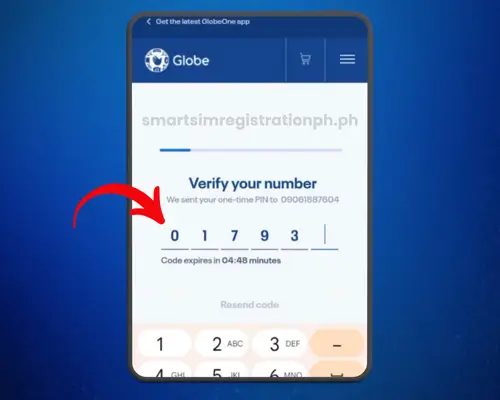
Step 03: Check your phone for the OTP and input it on the site to verify your SIM.
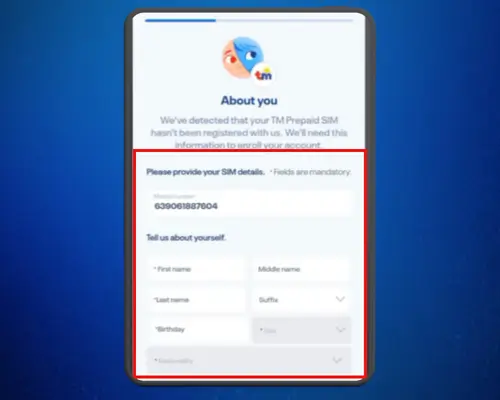
Step 04: Provide Your Personal Information. Fill in your full name, date of birth, gender, and current address as shown on your government ID.
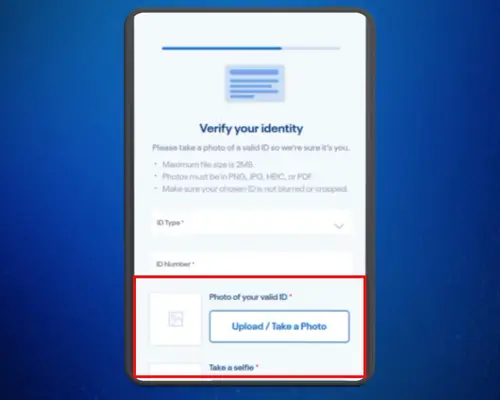
Step 05: Upload a Valid ID and Selfie. Take a clear photo of your government-issued ID and upload it and fill other required details.
Step 06: Review and submit:
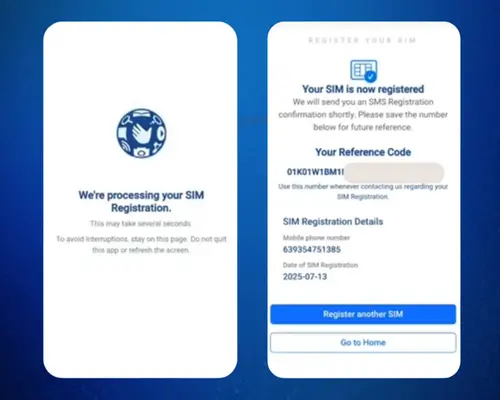
Double-check your details before submitting. You’ll receive a confirmation message once the registration is complete.
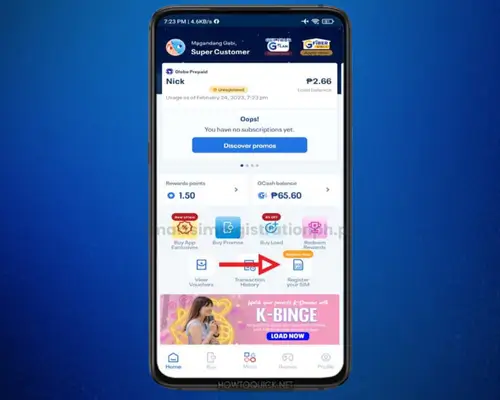
2. Register through GlobeOne App
You can register your TM SIM using the GlobeOne App, which is available for Android and iOS devices. The Process is almost same as the portal but here is step by step for your ease:

Step 01: Go to Google Play Store (for Android) or App Store (for iOS). Search for GlobeOne App and install it on your device.
Step 02: Open the app and sign in using your TM mobile number. If you don’t have an account yet, tap “Create Account” and follow the steps.
Step 03: Enter your TM number and wait for the OTP (One-Time PIN) sent via SMS. Enter the OTP in the app to confirm your number.
Step 04: Fill in your full name, birth date, gender, address, and nationality. Make sure the information matches your valid ID.
Step 05: Take a clear photo of your valid government-issued ID. Snap a selfie in good lighting for verification. Commonly accepted IDs include PhilHealth ID, Driver’s License, Passport, and UMID.
Step 06: Review your details and submit the form. You’ll receive an SMS or app notification once your registration is successful.
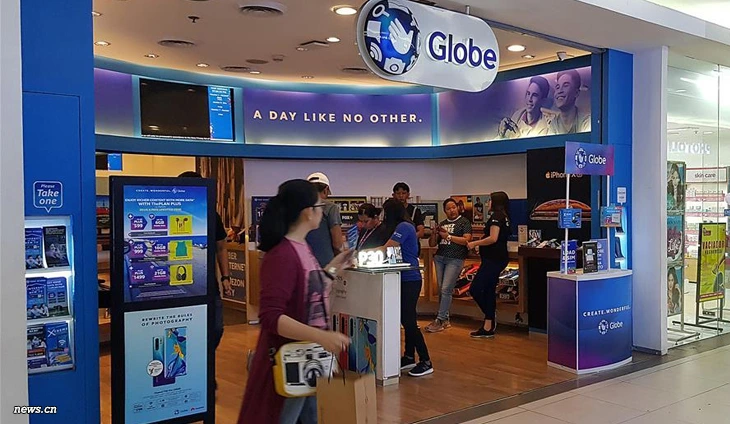
3. How to Register TM SIM at TM/Globe Stores
If you prefer offline registration or don’t have internet access, you can register your TM SIM at the nearest TM or Globe store. Here’s what to do:
- Visit an official store: Go to the nearest TM or Globe service center. You can find store locations on the Globe Store Locator.
- Bring the necessary documents: Your TM SIM card and the phone where it’s inserted.
- A valid government-issued ID: Make sure the ID matches the details you’ll provide.
- Prepare personal details: Full name, Date of birth, Address, Nationality
- Provide biometric verification (if required): Some stores may ask for a photo or fingerprint scan as an extra security measure.
- Complete the registration: A store representative will help you fill out the registration form. They’ll upload your ID and photo to the system.
- Get confirmation: Once your details are submitted, you’ll receive an SMS confirmation when the registration is complete.
The following is a list of authorized stores where you can complete your SIM registration.
| Company Name | Type of Retail | Number of Stores |
| Rustan Supercenters Inc. | Supermarkets | 30+ |
| Mercury Drug Corp. | Drugstores | 1,200+ |
| SM Retail Inc. | Department stores, Supermarkets | 2,800+ |
| Alfamart | Convenience stores | 1,000+ |
| Golden ABC Inc. | Clothing retail | 800+ |
| Puregold Price Club Inc | Supermarkets | 400+ |
| 7-Eleven | Convenience stores | 3,000+ |
| Robinsons Retail Holdings Inc. | Department stores, Supermarkets | 1,800+ |
| Metro Retail Stores Group Inc. | Department stores, Supermarkets | 50+ |
| SSI Group | Specialty retail | 500+ |
Tip: Go during non-peak hours to avoid long lines. Also, double-check that the store is an official Globe/TM branch, not a third-party kiosk, to keep your data safe.
4. TM SIM Registration via SMS (If Available)
TM sometimes provides an SMS registration option for users with limited internet access. This method is simple, but availability may vary depending on current policies.
How to Register via SMS
- Insert your TM SIM into your phone: Ensure it has a strong signal and enough balance for sending messages.
- Compose a text message with your details: The format typically includes:
- Full Name
- Date of Birth (MM/DD/YYYY)
- GenderAddress
- Type of ID and ID number
REG <FullName>/<Birthday>/<Gender>/<Address>/<IDType>/<IDNumber>- Send the message to the official registration number
The dedicated number is usually 8080 or a similar TM service code. Check TM’s official website or confirm through their customer support before sending. - Wait for confirmation
- TM will verify your details and send an SMS confirming your registration status.
- If there’s an error, they’ll provide instructions on how to correct it.
TM SIM Registration for Special Cases
Some users fall under special categories, and the registration process may require extra documents. Here’s what you need to know:
Company-Owned SIMs
- Companies must register SIM cards under the business name.
- Requirements:
- Company name and address
- Authorized representative’s full name and ID
- Special Power of Attorney (SPA) or authorization letter
- Valid government-issued ID of the representative
- Process:
- Submit documents through the TM online portal or at a TM/Globe store.
Foreign Nationals
- Foreigners in the Philippines need to register their SIM based on their visa type.
- Tourists:
- Passport with entry stamp
- Local address in the Philippines
- Return ticket to the country of origin
- Foreign Residents:
- Passport with valid visa
- Alien Certificate of Registration (ACR) or residence permit
- Proof of local address (utility bill, lease contract)
Minors
- SIM registration for minors requires a parent or guardian.
- Requirements:
- Birth certificate of the minor
- Parent or guardian’s valid government-issued ID
- Important:
- The SIM will be registered under the parent or guardian’s name for security.
How to Check TM SIM Registration Status
You can confirm if your TM SIM is registered through several simple methods. Checking your status ensures that your SIM is active and compliant with the SIM Registration Act.
Via GlobeOne App
- One the GlobeOne app.
- Enter your TM number and log in.
- A one-time PIN will be sent via SMS for verification.
- Once logged in, go to your profile or settings. If your SIM is registered, it will show a “Registered” badge or a similar status confirmation.
Via SIM Registration Portal
- Go to https://simreg.globe.com.ph.
- Click on the “Check Status” option if available.
- You may be asked for your reference number or basic details. The portal will display the current registration status of your SIM.
Via TM Customer Support Number
- Dial 808 (for free) from your TM number. You can also call (02) 7730-1000 using any phone.
- Choose the option for SIM registration assistance.
- Ask representative to confirm the registration status of your SIM. Keep your valid ID and personal details handy in case they ask.
In Stores
- Visit a Globe or TM Store Near You: Bring a valid government-issued ID and your TM SIM.
- Ask for Registration Status: A staff member can check your status using their system.
How to Switch to TM (SIM Card Portability)
You can keep your existing mobile number and switch to TM through Mobile Number Portability (MNP). This process is free and approved under the Philippine Mobile Number Portability Act (RA 11202).
Steps to Port Your Existing Number to TM
- Check Eligibility: Your current SIM must be active and registered. All outstanding balances with your current network should be cleared.
- Text USC to 5050 using your current SIM. You will receive your Unique Subscriber Code, which is valid for 15 days.
- Prepare Your Requirements: Valid government-issued ID. Your USC code from your current provider. Active TM SIM or purchase a new one if needed.
- Visit a TM or Globe Store: Go to the nearest TM/Globe store. Present your USC code, valid ID, and TM SIM. Fill out the porting application form.
- Wait for Confirmation: Once your request is approved, you will receive a text notification. Insert your TM SIM when instructed to complete the switch.
Important Notes:
- The porting process usually takes 24 hours, but in some cases, it can take up to 48 hours.
- Make sure your number is active during the process to avoid delays.
- MNP does not affect your mobile wallet or app accounts, but check linked services before switching.
How To Check TM SIM Balance?
Knowing your remaining balance helps you manage your calls, texts, and data effectively. TM offers multiple ways to check your SIM balance. All methods are free and easy to use.
1. Check Balance via SMS
2. Check Balance via USSD Code
3. Check Balance via GlobeOne App
4. Check Balance via TM/Globe Hotline
Rewards, Promos & Freebies After TM SIM Registration
Registering your TM SIM is not just about compliance—it comes with exciting perks that give you more value for your money. TM rewards its users with free data, bonus texts, exclusive promos, and reward points after successful registration.
Freebies You Get After TM SIM Registration
Once your SIM is verified, you can expect these common freebies:
- Free Data: Get up to 3 GB of free mobile data to browse your favorite apps.
- Free Texts & Calls: Complimentary texts to all networks and unlimited TM-to-TM calls for a limited time.
- TM Rewards Points: Earn points instantly that you can later convert into load, data promos, or even discounts on partner brands.
Pro Tip: These offers are often time-limited. Claim your freebies right after registration through the GlobeOne App or by dialing *143#.
TM Rewards You Can Enjoy
TM’s reward system lets you collect points every time you load up. These points can be used to redeem:
- Free Data Packages (e.g., SurfSaya, GoSurf)
- Call and Text Bundles
- Discounts on e-commerce and partner stores
To check your rewards:
- *Dial 143# > TM Rewards > Check Points
- Or use the GlobeOne App for an updated rewards list.
Popular TM SIM Promos
After registration, you’ll get access to exclusive promos designed for budget-friendly connectivity:
- SurfSaya – Affordable data + unlimited texts and TM-to-TM calls.
- AT20 – Unlimited TM calls and texts for 1 day plus data allocation.
- TM FunSURF – Extra GB for social apps like Facebook, TikTok, Instagram.
Note: Promo names and inclusions may change, so always confirm via the GlobeOne App or TM’s official website.
TM Customer Support & Helpline
If you face any issues with your TM SIM registration, you can contact TM through the following official support channels:
- Dial 808 from your TM number (Free for TM users)
- Call (02) 7730-1500 using a landline or other networks
- Hotline Availability: 24/7 for general inquiries and SIM registration assistance
- GlobeOne App Help Center: Available inside the app for chat support and FAQs.
- In-store Support: Visit any Globe Store or TM partner retailer for assistance with SIM registration or account issues.
Common TM SIM Registration Errors & Fixes
When registering your TM SIM, you might face some issues. Here are the most common errors and how to fix them:
1. Selfie or Photo Upload Issue
Cause: Low-quality image, poor lighting, or unsupported file format.
Fix:
2. OTP (One-Time Password) Not Received
Cause: Poor network signal or incorrect number entry.
Fix:
3. Registration Timeout
Cause: Inactivity during the process or unstable internet connection.
Fix:
4. App Crash or Portal Error
Cause: Outdated app or temporary system issue.
Fix:
5. SIM Already Registered
Cause: SIM was registered earlier or ID is linked to another SIM.
Fix:
6. Invalid ID
Cause: Uploaded ID is not in the accepted list or details don’t match.
Fix:
Frequently Asked Questions (FAQs)
What is the official TM SIM registration link?
The official link is https://simreg.globe.com.ph. Do not sharing your personal information with scammers. Always check for “https” in the URL and confirm it’s under the globe.com.ph domain.
Is SIM registration required for all TM users?
Yes. Under the Philippine SIM Registration Act (RA 11934), all prepaid and postpaid SIM cards, including TM, must be registered to stay active. Unregistered SIMs will be deactivated.
Can I register multiple TM SIM cards under one name?
Yes. You can register more than one SIM, but you need to provide the required ID and personal details for each SIM.
What should I do if my SIM is already registered but I forgot the details?
You can check your registration status via the GlobeOne App or by contacting TM customer support.